

Queue Bindings To Build A Notification System Using Rabbitmq


Building applications in form of Microservices, is the way companies are now developing applications that scale, keeping each functional module as a separate service. All these services come together to form a whole system. The notification system can be built, in the form of a Microservice, since its architectural pattern supports it. Each module is built as a separate service, and they all talk to each other through a medium. The benefit of using a message broker, is that, both the sender and the receiver can both communicate with one another, without talking to each other directly. Another upside of a message broker is that, when the receiver isn’t available, the messages are safely stored until the receiver comes back up.
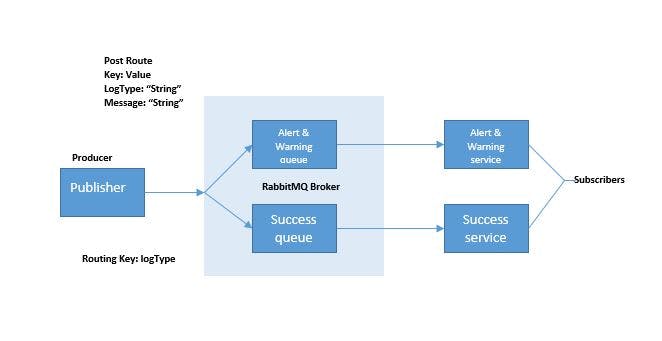
RabbitMQ is a secure message broker that helps in properly queuing messages. RabbitMQ plays the part of the middleman in the messaging system, it does this by accepting message from the sender and routing it properly to the receiver. The system architecture for the notification system is shown below:
This article is going to teach you a lot about RabbitMQ, like basic terms used in it. RabbitMQ supports many programming languages, but for the sake of this article, we will be using Node.js to build the notification system application.
Jump Ahead:
Definition of key terms: Queues, Publishers, Bind, Consumers, Exchange
Reasons to use RabbitMQ as your preferred message broker
Setup and Installation
Setting up and developing the publisher service
Setting up the two consumer service
Application outputs
Definition of Key Terms: Queues, Publishers, Bind, Consumers, Exchange
The notification system has a publisher (message producer) and one or more subscribers (message consumers). The publisher sends message(s) for the subscribers to receive. For the easy comprehension of this write up, we must first define some terms. These terms are:
Queue: In RabbitMQ, a queue is responsible for storing messages received and may contain configurations on how to handle that message. In a queue, the messages are normally stored in RAM, or it may pass them to a disk in FIFO order (First in First Out). A Queue is one of the components defined by the AMQ model. The queue we will use in this article will contain two exchanges, one for alerts and warning, and one for success.
Producer: A producer is one that creates a message, this message is in the form of an API Call, a post request, with two keys and their value pairs. These keys are:
“logType”: “String”
“message”:”String”
This message(s) accompany a Routing key which is the logType.
Subscriber / Listener: This is one that consumes a message.
Bind: This means to tie a queue to an exchange, message received with the particular key of that queue will be routed to that main queue.
Exchange: This is where the message(s) gotten from the publisher is properly bind to the queue with the corresponding key.
Reasons to use RabbitMQ as your preferred message broker
RabbitMQ is lightweight, requiring less than 40MB of RAM to run at its maximum.
RabbitMQ is flexible in providing message tradeoffs.
It supports the use of third party plugins.
Setup and Installation
This application needs the following dependencies to work:
Erlang
RabbitMQ
Node.js
Express.js
bodyParser
Nodemon (for watching changes)
amqplib
Setting Up and Developing the Publisher Service
We will create a new directory and name it publisher. This can be done with a mkdir linux command. Once we’ve completed this process, we will initialize a package.json file with the npm init –y command. We will create a server.js and a producer.js file inside the producer folder. Then we will run the below command to install the rabbitmq advanced messaging queuing protocol dependency for node.js.
npm i amqplib
This dependency enables connection to the RabbitMQ server. Once this process is complete, the next step is to require the amqlib dependency and config.js file to use.
const amqp = require('amqplib')
const config = require('./config')
Then we create a Publisher class that houses functions to be used by the publisher service.
class Publisher {
After this, we make an aync / await promise to connect to RabbitMQ port using the url stored in the config.js file. Once the connection mounts successfully upon await, then a connection is created with the createChannel() method.
async createChannel () {
const connection = await amqp.connect(config.rabbitMQ.url);
this.channel = await connection.createChannel();
}
channel ;
Next we create a sendMessage function that takes in two arguments which are: routingKey and message.
Then we use the if statement to check if a channel isn’t available, if it isn’t then the createChannel method is triggered thereby creating a channel in the process.
async sendMessage(routingKey, message){
if ( !this.channel) {
await this.createChannel()
}
Next step is, we connect to the exchange with the exchange name we passed in the array named rabbitMQ in the config.js file.
const exchangeName = config.rabbitMQ.exchangeName;
await this.channel.assertExchange(exchangeName, 'direct')
The next step is to create an array of object and call it logDetails which will be used by the publish method in the later part of this code. This objects will be parsed into JSON when a request is sent.
const logDetails = {
logType: routingKey,
message: message,
dateTime: new Date(),
}
All this keys are used for making post request to the /sendmessage route. The logType indicated will be used to route the message to the proper queue. The logType will either be alertandWarning or success. The notification message is then entered. The appropriate date is automatically assigned for each successful request sent. The publish method takes in two argument named: exhangeName and routingKey and publishes the messages in JSON format from the logDetails array we created earlier.
await this.channel.publish(exchangeName, routingKey,
Buffer.from(JSON.stringify(logDetails))
)
The next step is to display the message using console.log together with the message and name of exchange. We also export the Publisher class create using the module.exports method.
console.log(` The message ${message} is sent to the ${exchangeName}`)
}
}
module.exports = Publisher
We will also create a new file and name it server.js. We will then require the express and bodyParser dependency, then initialize the app and Publisher class required from the publisher.js file.
const express = require('express')
const bodyParser = require('body-parser')
const app = express()
const Publisher = require('./publisher')
const publisher = new Publisher()
Then we will use the bodyParser dependency to parse the values gotten from the request body. In the post method. The publisher.send message method takes in two arguments both gotten from the request body of the post method gotten. The response is waited for using the await promise. The next step is to use the res.send() method to the send the response.
app.use(bodyParser.json("application/json"))
app.post("/publishmessage", async (req, res, next) => {
await publisher.sendMessage(req.body.logType, req.body.message)
res.send()
})
Then we assign a port for the server to listen to and display it on the console with a message in parenthesis.
app.listen(3000, ()=> {
console.log("Backend server has started...")
})
Setting Up the Two Consumer Service
We will create a new directory and name it success. This service handles success notifications by consuming the messages sent by the Publisher service. After this, we will need to create a second consumer service, this service will be called the alertandWarning service. The first step we will take is by requiring the amqplib dependency, after that, we will create a function for receiving messages. This function will house other functions. Next step is to create a function that consumes data by making a connection to the success queue and then pulling the message from there. We also added an async / await promise to connect to RabbitMQ port, and created a new function to create a new RabbitMQ channel. This whole process is expressed in the code below:
const amqp = require('amqplib')
async function receiveMessages() {
const connection = await amqp.connect('amqp://localhost')
const channel = await connection.createChannel()
Through the channel, we connect to the exchange we created and called notification by passing it as an argument.
await channel.assertExchange('notification', 'direct')
The next step is to link the channel to the success queue using the RabbitMQ assert queue method we created as shown in the code below:
const q = await channel.assertQueue('successQueue')
Next, we bind the channel to the queue by passing it as an argument in the function. We passed it two arguments which are: notification and success respectively.
await channel.bindQueue(q.queue, 'notification', 'success')
The next code consumes the data from the exchange and then parses it into JSON.
channel.consume(q.queue, (msg)=>{
const data = JSON.parse(msg.content)
Then we display the data parsed by displaying it on the console.
console.log(data)
The next code helps to clear the message log once it has been viewed, this helps to keep the message queue clean. If we wish to keep every message consumed and display it on the console, we can simply omit this line of code.
channel.ack(msg)
})
}
receiveMessages()
We also created a config.js file, then created an array called RabbitMQ and then gave it two keys and values which can be imported into other files. We also make them exportable by using the export keyword.
For the second consumer service, the process is very similar to the first one, almost like we’re repeating process, but this time, we will be binding the service to the alert and warning queue instead of the success queue. This is shown in the code below:
const amqp = require('amqplib')
async function receiveMessages() {
const connection = await amqp.connect('amqp://localhost')
const channel = await connection.createChannel()
await channel.assertExchange('notification', 'direct')
const q = await channel.assertQueue('alertandWarningQueue')
await channel.bindQueue(q.queue, 'notification', 'alert')
await channel.bindQueue(q.queue, 'notification', 'warning')
channel.consume(q.queue, (msg)=>{
const data = JSON.parse(msg.content)
console.log(data)
channel.ack(msg)
})
}
receiveMessages()
Application Outputs
The following are the outputs of the application developed and also of the RabbitMQ Management interface that houses the notification system channel, connection, exchange and queue.
CONCLUSION
Developing notification systems in today’s world has never been easier. With technologies like RabbitMQ, handling notifications in real time requires a low consumption of RAM making the process faster and efficient. You can freely clone this project on the github repository.